Creating a site-to-site Azure VPN with PFSense
First I need to create a Azure Virtual Network and Subnet. I go to All services ![]() and find Virtual networks
and find Virtual networks
![]()
I add a Virtual network called EastAzureVnet with a Subnet called EastServerSubnet and leave the defaults. (Make sure this address space doesn’t overlap with your on-prem network)

Now I open my Virtual network I just created called EastAzureVnet and click Subnets and click Gateway subnet

Leave the defaults and click OK

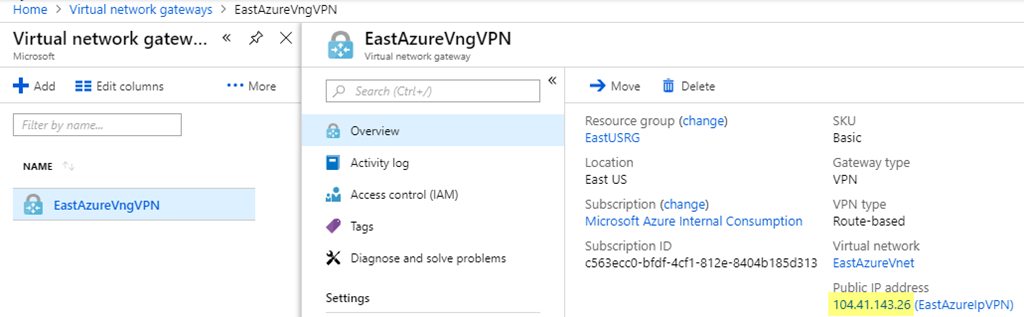
Virtual Network Gateway
I need to create a Virtual Network Gateway. I go to All services and find Virtual network gateways![]()
I set the following values and click Create. (Note: This will take about 15 minutes, so go have a ![]() or a
or a ![]() )
)
Name: EastAzureVngVPN
SKU: Basic (If this were for production I would choose VpnGw1 or higher)
Virtual network: EastAzureVnet
Public IP address: EastAzureIpVPN

Local network Gateway
Next we need to create a Local Network Gateway. I go to All services and find Local network gateways ![]()
I use my on-prem network information.
My lab uses IP address range 192.168.2.1 – 192.168.2.255 (aka 192.168.2.0/24)
My Example External IP is 67.37.217.79

After it is created click on the Local Network Gateway called EastAzureLngVPN and click Connections, Then click Add

I use the following information and Click OK. Create and save your shared key as you will need this when setting up the PFSense side. (You will want your Shared key to be more complex then the example)

PFSense
In Azure go back to Virtual Network Gateways and get your public IP Address for your Azure VPN

Next I go over to my On-Prem PFSense Firewall and click VPN, IPSec

Click Add P1, I changed the following settings
For Remote Gateway use your Public IP Address from your Azure Virtual Network Gateway
For Pre-Shared Key use your Pre-Shared Key


Click Save
Then Apply Changes

Now Click Show Phase 2 Entries, and click Add P2

For P2 (Edit Phase 2). I go back to Azure to get the address space.

Set the Remote network address to the address space in Azure. (Not the Subnet)

Click Save, and Apply Changes.
Now if we go to Status, IPsec

I can see we have Established a connection

Lastly I need to create a firewall rule. I go to Firewall, Rules. The select IPsec and click Add

Change Protocol to Any. You can lock this rule down to suit your needs.

Click Save and Apply
To get DNS working correctly. (So you can Add VMs to your Domain)
I set you DNS server for your Virtual Network to my local On-Prem DNS server.

One note. Azure blocks much of ICMP traffic. So to test, create a VM with a Public IP Address of None. Then connect with Remote desktop.

For general information on Azure Site-to-Site VPNs see https://docs.microsoft.com/en-us/azure/vpn-gateway/vpn-gateway-howto-site-to-site-resource-manager-portal
Thank you very much! Your post helped me a lot
Thank you!
Thanks for taking the time to post this information.
Thanks, Very good… followed several other guides but couldn’t get it to work until I found yours.
Loving it!
Thank you. Now I can move on with my WVD installation.
Nice blog. I understood the concept very well. This blog is very informative. And it’s very interesting topic. Visit to get more knowledge. Want how to fix event 10016 error. please visit https://www.hex64.net/site-to-site-vpn-between-aws-and-sonicwall-utm/
Good post. But, a Virtual Network Gateway is quite expensive (£20 a month). Any reason you couldn’t create a small pfSense box for £5 a month and do a pfsense to pfsense connection? Just wondering about pros/cons of each. Thanks!
great post. Worked first time which amazed me!
Thanks a bunch!
Do we need to configure route table this?
No. Only if you want all azure internet traffic to traverse on prem. But most people only do that with express route.
My pfsense configuration is correct.
I can see connection status in azure as connected.
Still I am unable to ping/ssh/rdp any Azure VM from a vm in client segment of pfsense.
Any idea, why?
Very nice and detailed write up.
I am having the same issue, did you ever find a solution?
Thank you.
Second time I needed this 🙂
Thanks! This is great, however my dns is not resolving from Azure back to my homelab. :sadface:
In you vNet you need to set you DNS server to Custom and then point it at you homelab DNS server.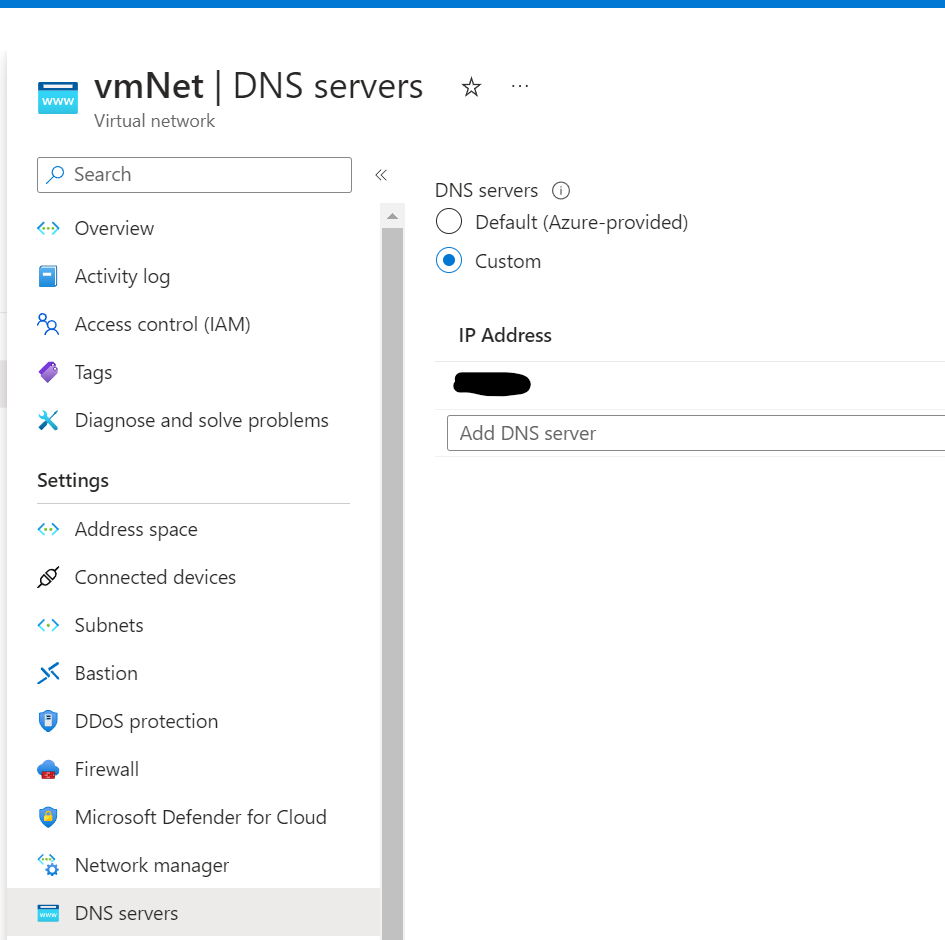
Hi there, hope you are still around.
I have followed your tutorial with the intent of using Azure VPN to route all of my internet traffic, so i changed the Phase 2 from 10.0.0.0 to 0.0.0.0/0 and that made my internet stop working. Now i see lots of Bytes-out in Phase 2 but zero Bytes-in.
Would you be able to help me identify what else i need to do in order to get this to work to tunnel all of my network traffic thru Azure VPN?
Thanks
Hi Luiz,
Phase 2 is going to be your Azure network. It tell your router anytime you need to get to the Azure network use this tunnel. If you set it to 0.0.0.0/0 that would be all traffic. That is why you internet would stop working. It would route all traffic to Azure. It would be another hop to get out to the Internet.
Hi Guys,
I’m having a problem connecting to PFSENSE and AZURE, but I’m using NAT on the Azure side but according to the policy, it can only be done based on routes in phase 2, I can’t use it based on policy.
I’ve already made several configurations following the documentation, but without success. Has anyone ever made this type of connection where Azure phase 2 is NAT?
I have followed this tutorial as closely as possible. The layout in the Entra ID console has changed a little bit.
I have an IPSec VPN up and running between my pf router and MS but I cannot ping my cloud domain from a shell in my TruNAS server as this article suggests I should be able to. And I cannot connect my NAS to the domain.
This was my goal. Any additional pointers?
Thanks,
David
https://www.truenas.com/docs/solutions/integrations/entraid/