Fix SCOM Maintenance Mode Scheduler schedules after a DST time change

If you are using the SCOM Maintenance Mode Scheduler with SCOM 2016 or above and you had a Daylight Savings Time change.

We recommend you running Kevin Holman’s PowerhShell script to fix any schedules that were created with a Start Date time before the change. If you look at an existing schedule, you can see that the intended run time for Maintenance Mode is 6pm, however, since the DST event, the next run time is calculated at 7pm:

PowerShell Script:

Download

More information can be found on Kevin’s blog post here.
https://kevinholman.com/2020/03/09/fix-maintenance-mode-schedules-after-a-dst-time-change/

Continue Reading

SCOM DataWarehouse Grooming Settings is now Super Easy with new GUI tool

Do you find it a huge pain to run the outdated and buggy command line tool DWDATARP to adjust SCOM DataWarehouse settings?  This little GUI based tool makes it super easy to adjust the settings.

This new GUI tool can be ran from the SCOM servers or your desktop if you have access to the SCOM DataWarehouse Server.

Free Download

How to use

Before you start make sure you have DB Owner to the SCOM DataWarehouse Database.

Run the Tool.

Check you have the correct SQL server that has your SCOM DataWarehouse.  Then confirm the name of the Database.

Click Get Current Settings

This will show all of the DataWarehouse Datasets ordered by Percent of Database.

Then select the Dataset Name, Aggregation Type.  Then adjust Max Age (Day) of how long you want the data to stay in the SCOM DataWarehouse.

Then click Set

You should then get a confirmation that the settings have been changed.

It typically takes 24 hours for all the DataWarehouse grooming jobs to run.  After 24 hours run the tool again to confirm than your SCOM DataWarehouse Datasets have gotten smaller.

Kevin Holman has an excellent blog post on explaining DW Grooming in detail located here.  https://kevinholman.com/2010/01/05/understanding-and-modifying-data-warehouse-retention-and-grooming/

Continue Reading

Why Azure Monitor Workbooks are awesome and you should be using it now to supplement SCOM

With Azure Monitor Workbooks you can now quickly and easily make intelligent decisions about your infrastructure.

One of the things SCOM has never been good at is reporting or dashboards. I recently on-boarded a few VMs in my lab that have been running for months. If I look at SCOM everything looks great.  No performance issues or problems.

Now if I have a look at the same VMs in Azure Monitor Workbooks I see a totally different story.

I can quickly see that my DB07 server has CPU pegged.

I log into my server.  Yep CPU is pegged at 99%.  Even worse its not even SQL that is consuming the CPU.   Where were you at on this one SCOM?


Let me give another example.   If I scroll down in my workbook I can see another chart for available memory.

I can quickly see that one server DB01 has a ton of available memory.

I log into the SQL server and verify that I am wasting memory (relative to my lab size) on this server.

You might say well its because SQL Server is limited right?  Nope not the case.  SQL is set to consume as much as it needs.  I am just wasting memory.

Can’t I get this same data in SCOM? Not easily as most of the time with medium to large SCOM environments, the reports and dashboards take forever to show up or timeout. Azure Monitor can scale to hundreds of thousands of servers and still return this data in seconds.

How to use Azure Monitor Workbooks

First you will need a Log Analytics workspace.  https://docs.microsoft.com/en-us/azure/azure-monitor/learn/quick-create-workspace

Once you have a workspace you will need to point your SCOM agents at the workspace.  I recommend this method.  https://kevinholman.com/2017/08/16/adding-direct-agent-oms-workspace-and-proxy-via-powershell/

Then go to Azure Monitor, Workbooks, and select Performance.


Select your Subscription, Workspace, and Counter

Continue Reading

SCOM Maintenance Mode Scheduler

SCOM Maintenance Mode Scheduler makes enabling and scheduling maintenance mode simple for all users. Your IT staff will no longer have a reason why a server wasn’t put into maintenance mode.

The HTML5 web application now works with SCOM 2012 R2, 2016 and 2019. It deeply integrates into SCOM using all the new native maintenance mode scheduling capabilities. All your IT staff can quickly schedule maintenance mode without having to install and use the slow console.

Features:

  • Easily access web based maintenance mode scheduler from any browser (Chrome, FireFox, Safari and IE)
  • Schedule Windows/Unix Computers, Groups, and Objects like SQL Databases for maintenance in a few seconds.
  • Import a CSV containing a list of computers or groups for scheduled maintenance.
  • Instant MM: Server and application admins can instantly place servers into maintenance during reboots and maintenance windows directly from the server without requiring admin privileges to the server.
  • Instant MM can be called by a VB, PowerShell, or code from anywhere. This can be used to start and stop maintenance on any server for a specified amount of time. This makes it easy to integrate into your current change or software management process.

Additional Features:

  • Redesigned web application that works 5x faster then the previous version.
  • Works in multiple different modes.
    • Open Access:  You can choose to enable open access where anyone can schedule maintenance mode even if they are not in SCOM.
    • SCOM Role Based Access – Only allow SCOM users to access and schedule Computers, Groups, and classes they have access to.
  • Integrated Dashboard works in the SCOM Console.
  • Instant Maintenance Mode with URL Parameters.  Specify URL parameters ComputerName, ID, Min, Action to control maintenance mode.
  • Manage page will make it easy to see and manage any upcoming maintenance windows and identify any gaps
  • Uses the same role based permissions that SCOM 2016 uses. Users will only be able to schedule maintenance mode for servers, groups, or objects they already have access to in SCOM.

Instant MM

This solution makes it easy for IT staff to put a server into maintenance mode without having to go to the SCOM console. On any server, the administrator can visit the SCOM Maintenance Mode Scheduler Instant MM website at http://yourMSserver/Home/MM/InstantMM

Create a shortcut on the desktop of the servers to make it even easier. This can be accomplished manually or by use SCCM, AD Group Policy or some other software deployment software

Integrated Dashboard

Instant Maintenance Mode with URL Parameters

SCOM Maintenance Mode Scheduler has the ability to add parameters to the URL.

  • ComputerName – Specify the Computer Name
    http://yourMSServer/MM/Home/InstantMM/?ComputerName=yourComputer.yourdomain.com
  • Min – Number of Minutes for Maintenance Mode
    http://yourMSServer/MM/Home/InstantMM/?Min=120
  • Action – Start or Stop Maintenance Mode
    http://yourMSServer/MM/Home/InstantMM/?MMAction=Start
    http://yourMSServer/MM/Home/InstantMM/?MMAction=Stop
  • Combine multiple URL Parameters
    http://yourMSServer/MM/Home/InstantMM/?ComputerName=DB02.scom2k16.com&Min=120&MMAction=Start

Instant Maintenance Mode using PowerShell, VBScript or Code.

Using the new URL Parameters, you can now put servers into Maintenance Mode from any computer using a script or code.  Typical use case would be using SCCM when updates or software is installed.  SCCM would execute the VB or PowerShell script before the install process to start maintenance mode.  After the updates or software is installed SCCM would call the script to stop maintenance mode.

VB Script Example    Download: https://www.scom2k7.com//wp-content/uploads/2018/10/computerMM.renameTOvbs.txt

Dim o, mmServer, computerName, min, action, fullURL

if WScript.Arguments.Count < 0 then
    WScript.Echo "Missing parameters"
end If

mmServer = WScript.Arguments(0)
computerName = WScript.Arguments(1)
min = WScript.Arguments(2)
action = WScript.Arguments(3)

Set o = CreateObject("MSXML2.XMLHTTP")
fullURL = "http://" & mmServer & "/MM/Home/InstantMM?ComputerName=" & computerName & "&Min=" & min & "&Action=" & action
WScript.Echo fullURL

o.open "GET", fullURL, False
o.send

PowerShell Example     Download: https://www.scom2k7.com//wp-content/uploads/2018/10/computerMM.renameTOps1.txt

param (
    [Parameter(Mandatory=$true)][string]$mmServer,
    [Parameter(Mandatory=$true)][string]$computerName,
    [Parameter(Mandatory=$true)][string]$min,
    [Parameter(Mandatory=$true)][string]$action
 )

$FullURL = "http://" + $mmServer + "/MM/Home/InstantMM?ComputerName=" + $computerName + "&Min=" + $min + "&Action=" + $action
$FullURL

Invoke-Webrequest -uri $FullURL -UseDefaultCredential

Unix Example using Wget

wget -q http://vom/MM/Home/InstantMM?ComputerName=vDB.scom2k16.com&MMAction=start

Any problems, bugs, or issues please e-mail:  support@scom2k7.com.com

Continue Reading

Stop collecting all the worthless SCOM events in your environment

Quick Download: https://gist.github.com/timmcfadden/0e2912b6ba1e524898c81f921aefcb02/archive/022c9351b99eb9c247601c4f537e825297f803be.zip

Do you want to stop collecting all the worthless SCOM events in your environment?  By default SCOM collects thousands of events out of the box with a few Management Packs installed. 99.999% of the time no one is looking at these events.  The events bloat your database and often times provide zero value.

A customer was recently was decommissioning two SQL servers that created 35 Million SCOM events in 2 days.  The events took up 60GB of DB space and crashed their production SCOM.

First we need to create a Management Pack to hold all the overrides.

image

I called mine “SCOM2K16 – Disable All Events”

Copy the script to one of your management servers and run it locally.

Now we simply run this powershell script on one of your management servers

The magic in the script is that it only disables event collection rules that don’t alert.  Rules that do alert we want to keep on, so it won’t disable them.


image


The script will take a long time to run as there may be thousands of rules that need to be turned off.

Thanks to Brad Watts for help with the script.

Continue Reading

Creating a site-to-site Azure VPN with PFSense

First I need to create a Azure Virtual Network and Subnet.  I go to All services image and find Virtual networks

I add a Virtual network called EastAzureVnet with a Subnet called EastServerSubnet and leave the defaults.  (Make sure this address space doesn’t overlap with your on-prem network)

image

Now I open my Virtual network I just created called EastAzureVnet and click Subnets and click Gateway subnet

image

Leave the defaults and click OK

image

Virtual Network Gateway

I need to create a Virtual Network Gateway.  I go to All services and find Virtual network gatewaysimage

I set the following values and click Create(Note: This will take about 15 minutes, so go have a Beer Mug on Google Android 9.0 or a Hot Beverage on Google Android 9.0)

Name: EastAzureVngVPN

SKU: Basic  (If this were for production I would choose VpnGw1 or higher)

Virtual network: EastAzureVnet

Public IP address: EastAzureIpVPN

image

Local network Gateway

Next we need to create a Local Network Gateway. I go to All services and find Local network gateways  image

I use my on-prem network information. 


My lab uses IP address range 192.168.2.1 – 192.168.2.255 (aka 192.168.2.0/24)

My Example External IP is 67.37.217.79

image

After it is created click on the Local Network Gateway called EastAzureLngVPN and click Connections,  Then click Add

image

I use the following information and Click OK.  Create and save your shared key as you will need this when setting up the PFSense side. (You will want your Shared key to be more complex then the example)

image


PFSense

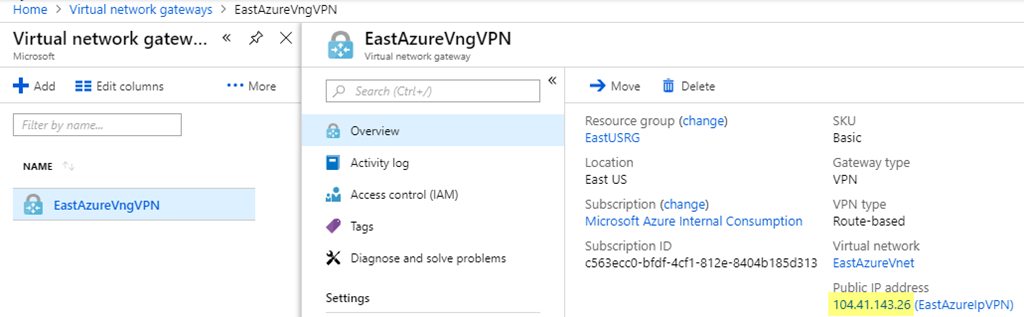
In Azure go back to Virtual Network Gateways and get your public IP Address for your Azure VPN

image

Next I go over to my On-Prem PFSense Firewall and click VPN, IPSec

image

Click Add P1, I changed the following settings

For Remote Gateway use your Public IP Address from your Azure Virtual Network Gateway

For Pre-Shared Key use your Pre-Shared Key

image

image

Click Save

Then Apply Changes

image

Now Click Show Phase 2 Entries, and click Add P2

image

For P2 (Edit Phase 2).  I go back to Azure to get the address space.

image

Set the Remote network address to the address space in Azure.   (Not the Subnet)

image

Click Save, and Apply Changes.

Now if we go to Status, IPsec

image

I can see we have Established a connection

image


Lastly I need to create a firewall rule.  I go to Firewall, Rules.  The select IPsec and click Add

image

Change Protocol to Any.  You can lock this rule down to suit your needs.

image

Click Save and Apply

To get DNS working correctly. (So you can Add VMs to your Domain) 

I set you DNS server for your Virtual Network to my local On-Prem DNS server.

image


One note.  Azure blocks much of ICMP traffic.  So to test, create a VM with a Public IP Address of None.  Then connect with Remote desktop.

image

For general information on Azure Site-to-Site VPNs see https://docs.microsoft.com/en-us/azure/vpn-gateway/vpn-gateway-howto-site-to-site-resource-manager-portal

Continue Reading

Quickly fix SCOM scripts from Exported Management Packs with Transform Tool

Quick Download: https://gallery.technet.microsoft.com/Fix-SCOM-from-Exported-e011ab52
Source: https://github.com/timmcfadden/SCOM-Transform-Tool

Have you ever exported a MP with a script and tried to run it on the command prompt and it fails yet seems to work fine when SCOM runs it.

If I export the MP from SCOM using PowerShell.

Get-SCOMManagementPack -DisplayName "Microsoft SQL Server 2014 (Discovery)" | Export-SCOMManagementPack -Path c:\temp\

Then open it up in NotePad++ and search for the script name. In my case it is DiscoverSQL2014FileGroups.js

Now I copy the script to a file of its own and try to run it on my SQL 2014 server. I use the command line from above

"C:\Windows\system32\cscript.exe" /nologo "DiscoverSQL2014FileGroups.js" "{2B758984-7383-2601-C53C-2CA0230DD4A4}" "{0A0C96F4-897D-F150-06EE-9BF68EF9C18D}" "DB12.SCOM2K16.com" "DB12" "MSSQLSERVER" "1433"

But I get a script error.

The issue is the exported mp changes some of the characters in the script. So we need to change the characters back so we can run it manually.

With the Transform Tool I copy and paste the script. Then I hit Unescape.

I copy the updated code and take a look at it. I can see that it changed the characters back to what they should be.

I run the script on the SQL server and it now works.

Continue Reading

Are you annoyed when working in the SCOM console and the console window disappears to the background?

Working in the SCOM console, when closing a window the console will occasionally disappear.  You have to go to the task bar to find it and re-select the window.

To reproduce this;  First make sure the SCOM Console is full screen.  Then click on an alert created by a rule.  In the alert details, open up the rule by clicking on it.

Then click Configuration, and View.

Then close both windows.

The SCOM Console will disappear.

According to Kevin Holman there is a workaround that “everybody knows” except for me 🙂

The Workaround

Don’t have any windows in the background full screened when SCOM is full screen.  What happens is the SCOM console is moved behind any windows you have full screen.

The Long term fix.

Go to the SCOM User Voice and Up-Vote this;

https://systemcenterom.uservoice.com/forums/293064-general-operations-manager-feedback/suggestions/34145605-make-the-scom-console-windows-stop-disappearing

Continue Reading

Windows Server Driver Updates in the New Windows Admin Center are Awesome

Have you ever setup a lab machine running Windows Server and realized you are missing a bunch of drivers?  This can greatly affect disk I/O and overall performance of the server.  If you setup that same server running Windows 10 all the drivers and driver updates come down automatically (If Group Policy Allows it).

With the new Windows Admin Center you can now see and install driver updates in Windows Server 2016!

If I look at Windows Update on my Hyper-V Server.  I can see that there are no updates available.

But if I pull this same server up in Windows Admin Center.  I can see all the driver updates as well.

This makes using Windows Core or Server 1709 for my Hyper-V Host server a real possibility.  I no longer have to hunt down and create a custom ISO to install 1709 with the correct drivers.  All I need is the NIC drivers and I am golden.

Continue Reading

SCOM Self Service Portal

Imagine a world where server and application admins can install and maintain their SCOM agents themselves.  Imagine if they could quickly and easily create their own groups and then create new monitors and rules against them.  Imagine if they could create their own maintenance schedules and instantly put servers into maintenance mode with a click of a button.

This is all possible with the new SCOM Self Service Portal.

The new portal is built with HTML 5 and the latest web technologies and works with SCOM 2012 R2, SCOM 2016, and SCOM 1801.
Features:

  • Users can install, repair, uninstall, delete and reset agents. No longer do you have to be a SCOM admin to do this basic functionality.  Users are empowered to maintain their agents; the SCOM admin will no longer have to perform these tedious and time-consuming activities.
  • Users can create and maintain their own groups. With these groups they can then build their own event, service, and performance monitors.  They can also build their own performance collection rules.  All the difficult concepts to teach a user how to author their own monitors and rules is removed.
  • Users can create and maintain their own maintenance schedules from a website. Users can instantly put servers into maintenance mode without using or installing the console.  They can easily call the website from a script to use with their maintenance process.

Install Agents

A user with local admin privileges to a server, types in their username, password and the server they want to push to.  The agent and the latest installed update roll-up are pushed from SCOM to their server.

Delete Agents

An application or server admin can now delete their servers out of SCOM after they have decommissioned their server.  No longer having to get the SCOM admin involved.

Create Groups

Users can now create their own groups of servers.  They can use these groups for targeting monitors and rules.

When a group is created.  A new management pack, class, and basic views for Alerts, Performance and State are created automatically following management pack best practices.

Create Event Monitors

A user can create an event monitor by selecting the group of servers they want the event monitor to run on.  Then they type in the information from the event they want alerted on.

Create Service Monitors

A user can create a service monitor by simply picking the group and typing in the name of the service.

Schedule Computers for Maintenance Mode

A user can schedule future maintenance on their servers.

Instant Maintenance Mode

This solution makes it easy for IT staff to put a server into maintenance mode without having to go to the SCOM console. On any server, the administrator can visit the Instant MM website.

Creating a shortcut on the desktop of the servers can make it even easier.  With one click a server will be put instantly into maintenance mode.

Help Screens on every page

Anytime a user is confused or needs help.  They can click the help button on any screen to get detailed help.

Any ideas, problems, bugs, or issues please e-mail: support@scom2k7.com  or visit the user voice site https://scom2k7.uservoice.com

Continue Reading